Browning Buckmark Action Description
Introduction
This page describes how the action of the Browning Buckmark works, in moderate detail. The purpose of this description is to assist people who are either having problems with their Buckmark, or who are looking to modify their Buckmark to improve the trigger. All descriptions of the top, bottom, left, right, front, and back of components is relative to the pistol, when that component is correctly installed (i.e. the back of component X is the end that is towards the rear of the pistol when installed).
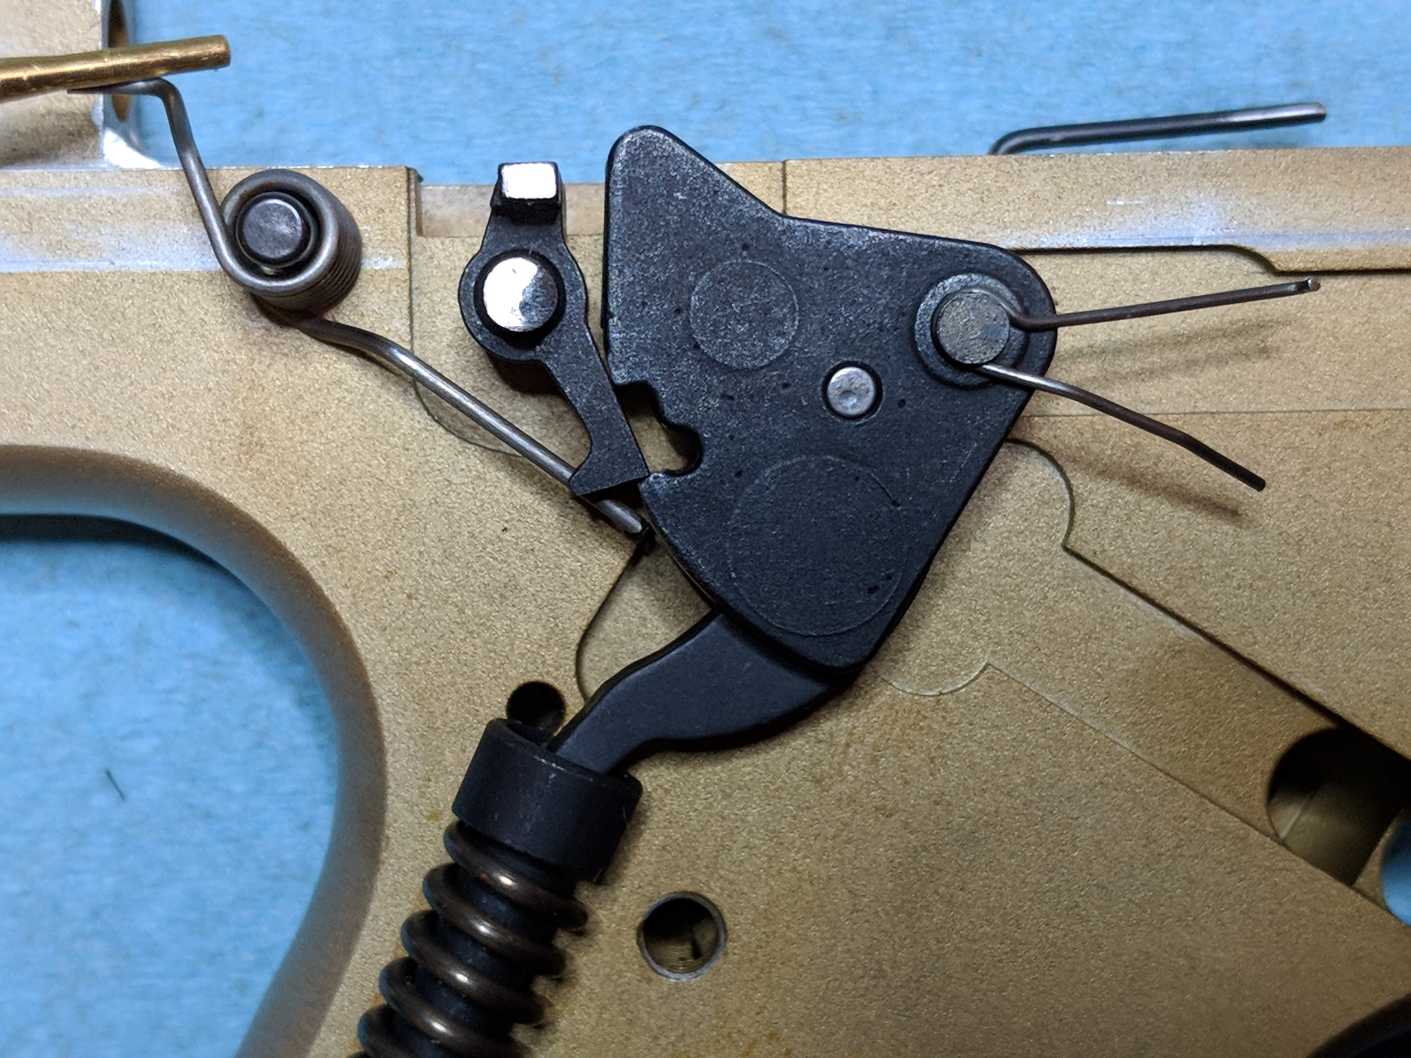
Add photo of trigger components in their relative positions, both when ready to fire, and when firing (hammer forward), and possibly when cycling (disconnector down)
Trigger mechanism
Starting Position: A round is in the chamber, slide is forward, magazine is inserted, at least one round is in the magazine, and all parts are in their firing or ready-to-fire positions (hammer cocked, safety off, etc.)
You pull the trigger back
The trigger rotates on the trigger pin (the lower, larger pin in the trigger), and thus the upper part of the trigger, including the disconnector pin (the upper, smaller pin in the trigger), gets pulled forward
The disconnector is mounted on the disconnector pin, and thus the disconnector is pulled forward
This forward movement of the disconnector is against the force of the disconnector spring
The small tab at the back end of the disconnector pulls the top of the sear forward
The sear rotates on the sear pin, and thus the bottom of the sear moves backward
The rearward movement of the bottom of the sear is against the force of the sear spring
This is why the strength of the sear spring affects the weight of the trigger pull
The hammer is also pushing (very hard) against the bottom of the sear, resisting movement
The friction between the sear and hammer affect both the trigger pull weight and trigger smoothness
The top surface and edge of the bottom part of the cutout in the rear of the hammer is the critical engagement surface on the hammer
The bottom surface and edge of the front bottom corner of the sear is the critical engagement surface on the sear
The hammer is being pushed (very hard) into the sear by the mainspring (via the mainspring plunger, hammer link, and hammer link pin)
When the bottom of the sear moves backward far enough, it releases the hammer
Note that, at this point, your trigger finger's work is done
Any additional movement by your finger leads to inaccuracy, which is why trigger over-travel limit screws are beneficial
The hammer, pushed by the mainspring (via the mainspring plunger, hammer link, and hammer link pin), is propelled upwards and forwards
The hammer rotates around the hammer pin, and the top of the hammer comes forward, striking the back of the firing pin
The firing pin slams forward into the rim of the shell casing, igniting the primer, which ignites the powder
This movement of the firing pin is resisted by the firing pin spring (but this does not affect trigger pull)
This movement of the firing pin is limited by the firing pin retainer (pre-2001) or the firing pin retaining pin (2001-present) that goes through the hole in the firing pin
Slide Cycle
The force of the expanding gasses from the burning of the primer and powder pushes the bullet forward and pushes the shell casing backwards
The shell casing pushes the slide backward
The shell casing hits the ejector wire, stopping it's rearward movement on the left, but the extractor claw on the right continues to pull the right side of the shell casing backwards
The shell casing pivots around the extractor claw, and is ejected from the gun (to the right)
As the slide moves backward, it pushes the disconnector down (the hump on the top of the disconnector was in a cut-out in the slide)
The downward movement of the disconnector separates the disconnector from the sear, effectively disconnecting the trigger from the sear (that's why it's called a disconnector)
The reason why you have to disconnect the trigger from the sear is because the sear needs to reset to its firing position, holding the hammer back, even while your finger is still holding the trigger back. You cannot let go of the trigger as fast as the slide cycles
As the slide moves backward, it also pushes the hammer back and down
The hammer rotates on the hammer pin, back and down, against the force of the mainspring
Additionally, the sear spring is pushing the sear against the outside rounded part of the hammer as the hammer moves (which is why you see wear marks there)
Once the hammer rotates down far enough, the sear spring pushes the sear into the cutout in the hammer, and holds the sear in there
This allows the sear to hold the hammer in the back/down position, even after the slide moves forward and thus the slide is no longer holding the hammer down
As the slide moves backward, it also clears the space above the magazine, allowing the magazine spring to push (via the follower) the next round up against the feed lips
this round was previously being held down by the bottom of the slide (center part)
As the slide moves backward, it also compresses the recoil spring
The recoil spring guide (black plastic tombstone) is captured in a cutout in the the slide, and thus moves backward with the slide
The recoil spring guide pushed the forward end of the recoil spring backward
When the slide moves back enough to contact the buffer, its rearward movement is done
The gun will operate without a buffer in place, but then the slide bashes against the frame instead of the buffer
The recoil spring now pushes the slide forward again
The forward movement of the slide causes bottom front of the slide (breech face) to hit/catch the back of the top round in the magazine
this shoves the round forward
when the round moves forward enough that the rim reaches the cutout in the top of the magazine, the rear of the casing is free to move upward
this is essentially the reverse of the motion that you used when inserting the round into the magazine
once released from the mag feed lips, the round is pushed upward by the magazine spring (via the follower)
the front of the round contacts the feed ramp, and this is guided up into the chamber
the continued forward motion of the slide shoves the round completely into the chamber
not sure: does the shell rim slide up under the extractor claw, or does the extractor claw get pushed into the rim and then go around it???
Once the slide is all the way forward (or nearly so), the slanted part of the disconnector cutout in the slide is above the hump in the top of the disconnector
the disconnector spring is trying to push the disconnector backwards and upwards into firing position, engaging the sear, but it can't
however, your finger is still holding the trigger back, and thus holding the disconnector forward, so the disconnector is still being held down by the slide???
as you let off the trigger, the disconnector spring pushes the disconnector back and up, pushing the hump up along the slanted part of the slide cutout
the disconnector spring provides the force that pushes the trigger forward as you release the trigger
once you have let off the trigger enough for the disconnector to engage the sear, the trigger has been reset to firing position
The whole process can now begin again
Thoughts on Trigger Improvement
Trigger component itself
The trigger rotates on the trigger pin (the pin does not rotate in the frame). Make sure this interface is clean and oiled or dry lubed.
The trigger rotates in the context of the frame. Make sure the sides of the trigger are clean, smooth, and oiled or dry lubed.
Note that the rear of the trigger component is exposed to significant fouling when shooting, so dry lube might be the best choice here, to prevent fouling build-up.
Disconnector
The disconnector moves in complex ways, and touches several other parts, and is a central player in the trigger pull. Therefore, making sure the disconnector is clean, lubed, and smooth will significantly impact how your trigger pull feels.
The disconnector moves with each trigger pull, and its motion is contained/controlled by:
1) The frame on the inside/left side. This is one of the biggest contributors to trigger roughness on new Buckmarks. Smooth the frame side of the disconnector, especially new disconnectors, with a piece of 1600 or 2000 grit sandpaper on a piece of plate glass. Be sure the tab on the bottom that is bent in, is not on the sandpaper/glass. You don't want to sand that down. You don't have to go crazy with the sanding; usually only a handful of light strokes is necessary to significantly smooth out this surface. These high-grit sandpapers can usually be found in auto parts stores, intended for sanding painted surfaces. A small piece of plate glass is easily obtained from a picture frame.
2) The disconnector pin, disconnector spring, and possibly the grip on the outside/right side. This side is usually not too rough, and shouldn't rub heavily against the grips. If you have significant rub spots between the disconnector and the grip, then
2.1) Ensure the disconnector pin is as far left as it can go without touching the left side of the frame (if you go too far left, this pin will prevent the trigger from moving at all).
2.2) Ensure that the disconnector is not excessively bowed. A little bow with the middle to outside/right side is ok, but not so much that it rubs the grip.
2.3) Look at the inside of the right grip, and see where it's rubbing. Consider sanding/grinding away the inside of the grip to prevent excess friction, if necessary.
2.4) Ensure that the tab on the disconnector is angled such that the disconnector spring is pushing the disconnector in towards the frame (in addition to pushing it back and up at an angle).
3) The disconnector pin controls the front-back motion of the disconnector. The disconnector rotates on this pin (this pin does not rotate in the trigger), so make sure these parts move smoothly together. Clean and lubricate both sides of this interface.
4) The up-down motion of the disconnector is complex. It rotates on the disconnector pin, so the front end doesn't move up or down at all. It is constantly being pushed up and back (and maybe a little inwards) by the disconnector spring. It cannot move up or down too far without contacting the frame. Look for wear in these areas, and clean, smooth, and lube both the frame and the disconnector where they touch. The rounded lobe at the top-back of the disconnector is pushed down by the slide as it cycles, or not pushed down by the slide when that lobe is inside the disconnector cutout in the slide (when the slide is forward, in battery). The rounded lobe should be smooth, but this affects cycling smoothness, not the trigger pull smoothness.
5) On Buckmarks that have a magazine disconnector safety (which prevents the gun from firing unless a magazine is inserted), the magazine disconnector wire limits the upward movement of the disconnector when no magazine is inserted (which prevents the disconnector from engaging the sear, and thus prevents the gun from firing). The magazine disconnector wire rubs on the disconnector (possibly on the top, inside, or outside surfaces of the disconnector), so make sure that these areas are smooth and lubed. Some people remove the magazine disconnector wire entirely, to prevent this drag on the trigger pull.
Disconnector Spring
Note that this forward movement of the disconnector as you pull the trigger is working against the disconnector spring (at an angle, so only partially, but still)
Thus the strength of this spring affects the trigger pull weight
However, the disconnector spring is already fairly light, and needs enough power to
1) Reliably push the disconnector back into place as the slide cycles
2) Push the trigger forward so that you can fire again (on some guns, this is called the trigger return spring)
So... it's not worthwhile to try to make this spring lighter in an effort to reduce trigger pull weight
That being said, it probably doesn't hurt to make sure this spring is clean and oiled, where it moves against the disconnector and against the frame itself
Sear
Surface that holds the hammer
Right side of the sear, where it touches the inside of the frame.
If using a replacement sear, or after modifying your stock sear, make absolutely sure that the safety lever still works and prevents the gun from firing
TEST: switch safety to SAFE (up), pull trigger (hammer should not fall), switch safety to FIRE (down), bump / jostle the gun (hammer should not fall), release the slide (hammer should not fall), bump / jostle the gun (hammer should not fall)
Sear Spring
Leg orientation - long leg front, short leg back
front leg goes into v-shaped notch in bottom-rear of sear (all models)
rear leg goes into adjuster screw for models so equipped (Silhouette & Target models)
rear leg goes into ???frame notch??? for other models
Heggis flip orientation - spring opens instead of closes
Flick Test - include description & links
Hammer
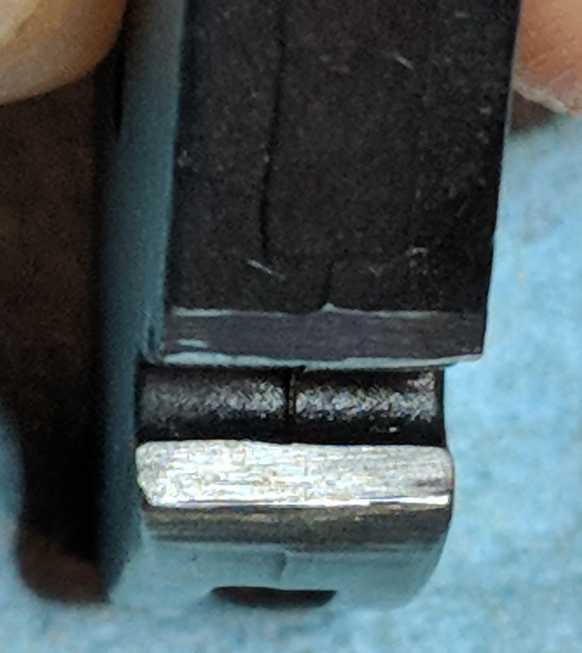
NOTE: Notice that the hammer has been filed above, below, and inside the gap/cutout in the back.
The filing above the gap allows the sear to sit back far enough to "catch" the hammer. (See photos).
The filing below the gap controls how much overlap there is between the sear and hammer.
The filing inside the gap, on the bottom, is where the sear holds the hammer when the hammer is cocked, and slides against
the hammer when you pull the trigger. If you stone this area to smooth or lighten the trigger pull, be VERY gentle,
you do not want to change the shape, angle, or edge geometry.
NOTE: The wear below the gap along the rounded lower back, is where the sear rubs against the
hammer when the slide cycles. The bottom of sear is pushed forward by the sear spring.
The sear is NOT affected by the trigger, because the cycling slide has pushed the disconnector down and away from the sear,
disconnecting the sear from the trigger.
NOTE: The wear spot on the top front of the hammer is where it contacts the firing pin.
Hammer-Sear orientation, cocked
Hammer filed areas
Where hammer and sear meet
Hammer Top View
(shiny spot where it hits firing pin)
Mainspring
Reducing creep
Trigger shelf - add material here (such as a thin layer of JB Weld) to reduce creep (too much and trigger won't reset reliably) (this is how aftermarket triggers reduce creep... they make this part thicker/taller)
Disconnector pin - should be reasonably tight in the disconnector hole - hammer disconnector to tighten
Disconnector notch - hammer disconnector flatter to close up this notch a little
Sear wobble on the sear pin - need good sear-to-sear pin fit - fix is to buy a few sears and a few sear pins, and use the tightest free-rotating combo
Excess sear-to-hammer interface area - file/grind/stone the hammer and/or sear to reduce engagement surface(s) (dangerous... needs to hold even when gun is dropped)
Reducing trigger pull weight
Disconnector Spring - not much to be gained here
Sear Spring - this is the key to pull weight
Heggis Flip
Bennett Twist
bending the legs
using smaller gauge wire
long leg forward, short leg back
ensure sear spring legs are in their correct locations
safety - flick test
Improving trigger pull smoothness
Clean & lube all moving/friction surfaces
Smoothing the trigger itself
Smoothing the disconnector
Smoothing the sear
Smoothing the hammer
Reducing over-travel
Trigger over-travel limit screw