Browning Buckmark
Buckmark Forums
Buckmark Parts - Replacements for worn / broken / lost parts
- Browning - Parts Department: 800-322-4626 Buckmark Pistol Parts/Price List
- Brownells - Buckmark Parts and accessories
- Midwest Gun Works - Buckmark Parts
- Midway USA - Buckmark Pistol Parts and accessories
- Numrich - Buckmark parts
- Jack First - Browning parts
- Ahlman's
- EveryGunPart.com - Sells Buckmark "parts kits" containing most of the parts, excluding the receiver.
- Replacement rail screws & grip screws - Ebay - halsey7 or Ebay - righteous_brother
- Replacement external-tooth lock washer (for rail screws) - McMaster-Carr or Bolts Plus
- Replacement c-clips (for recoil guide rod) - G.L. Huyett 3mm Cresent External Retaining Ring Clip
Buckmark Accessories and Aftermarket Parts (except grips)
- Tactical Solutions (TacSol) - makes "Trail-Lite" barrels for Buckmarks, and other "Trail-Lite" accessories for Buckmarks
- TandemKross - makes Buckmark Accessories - including a trigger, extractor, magazine baseplate and larger mag release button. They also resell some Volquartzen and TacSol stuff.
- Striplin Custom Guns - makes Buckmark Accessories including 1911 Grip Adapters and a slide racker
- Rusty 22 - Buckmark Customizations
- Sarona Gun Works (SGW) - Buckmark Parts including a trigger, an extractor, and a magazine spring
- Raptor Engineering reflex sight mount - replaces top rail with a sight mount for Burris Fast Fire & Vortex Venom red dots
- Allchin Gun Parts - makes STS Scope Mount, C-More Scope Mount, and mag base pads for Buckmarks
- OuterImpact - makes a red dot mount that replaces the top rail
- Volquartsen - used to make Buckmark parts but they seem to have stopped
- Williams Gun Sights - makes fiber-optic sights for Buckmarks
- Dawson Precision - makes plain and fiber-optic front sights for Buckmark models with screw-on ramp-style front sights
- EWK Arms - makes fiber-optic front sights for Contour models with the pinned front sight
Buckmark Grips
- Browning - Parts Department: 800-322-4626 Buckmark Pistol Parts/Price List
- Midwest Gun Works - Buckmark accessories
- Randall Fung Buckmark Target Grips
- Precision Target Pistol Grips - can make ergonomic grips for any Buckmark frame (UFX, URX, or UDX), including ones custom-fit to your hand
- Altamont Buckmark Grips - also sold by Grips4Guns.com
- HandgunGrips.com - Browning Grips - appears to resell Altamont grips
- Hogue - makes Buckmark UFX Grips and Buckmark URX Grips out of G10 or aluminum. They also make a grip sleeve with finger grooves (size: large) that fits over Buckmark UFX grips
- Tombstone Gun Grips - Browning Grips
- Eagle Grips - Buckmark & Challenger Grips
- Tillander Gun Grips - variety of grips made of high-impact resin for $10-$35 in any color
- Kelley Arms - wood grips for UFX / standard Buckmark grip frames
Buckmark Parts and Accessories Retailers (places that sell items, but do not make them)
- Midwest Gun Works - Buckmark Parts or Buckmark Accessories or Search for 'Buck Mark' or Search for 'Buckmark'
- Rimfire Sports & Custom - Buckmark Accessories - resells Browning, Tactical Solutions, TandemKross, and Volquartsen accessories
- Brownells - Buckmark Parts or Search for 'Buck Mark' or Search for 'Buckmark'
- Midway USA - Buckmark parts or Search for 'Buck Mark' or Search for 'Buckmark'
- Amazon - resells some Buckmark Accessories
- Cheaper Than Dirt! - Buckmark Accessories
Disassembly and Reassembly
1) You can scroll down the page and follow step-by-step
2) You can use the list of steps as your base, and click the link to each step as needed (there is a link back to the list of steps under each step detail section).
3) If you've done this a few times already, you can just use the list of steps as a guide, and never look at the details
Other disassembly and assembly information
(available from Gun Guides website, MidwayUSA, Amazon)
- it's ok, but the version I have does not cover all models (despite what the cover says).
Buckmark Pistol Schematic Diagrams
What parts typically break on Buckmarks?
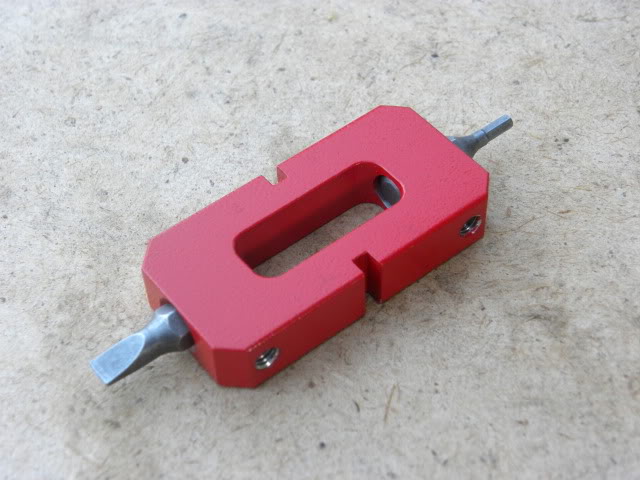
Buckmark MaintenanceTool
|
There's a guy with user name Rusty22 that is also active on the Buckmark forums on RimfireCentral.com. He makes the Buckmark Maintenance Tool. His website includes photos, and a nice video showing how to use the tool to disassemble a Buckmark. I ordered mine in October 2015 by sending him an email. It took a couple months, but he did respond, and then I sent him a check for $30, and he sent me the tool about 2 weeks later. |
Buckmark Model Information
Browning's Buckmark page - including lists of models: current production, limited production, and discontinuedQuality and accuracy do not vary much from model to model.
I'm not sure if this applies to all Buckmarks or not, but at least some Browning documents claim that the barrel has 6 right-hand (R.H.) grooves, with a 1 in 16" twist rate.
Yes, there are Browning Buckmark rifles, too. It's like a Buckmark pistol with a longer barrel, fore grip, and shoulder stock. They share a lot of parts with the pistols, so parts of this page are useful for the rifles, but I'm mostly interested in the pistols. The rifles have URX grip frames.
Media / Reviews / Articles about Buckmarks
- Guns.com - 2013 article about Buckmark History
- The Buck Mark Story - Guns Magazine, August, 1999 by Clair Rees
- American Rifleman - Gun of the Week for April 7, 2018 is the Buckmark Camper
- American Rifleman - 2018 review of the Buckmark Field-Target Suppressor-Ready model
- American Rifleman - 2017 Buckmark Models
- The Truth About Guns (TTAG) - Review of a Buckmark Camper
- Gun Digest - Buckmark Review from 2011
- Internet Movie Firearms Database page on the Buckmark
- Wikipedia page about the Buckmark (not very informative)
- Gunivore - Buckmark Review from 2017
- 19fortyfive - Buckmark Review from 2021
Owner's Manuals
- StevesPages - Buckmark Owner's Manual from before 1998 - contains disassembly instructions for pre-2001 models, schematics, and parts list (with pre-1998 part numbers)
- textfiles.com - Buckmark Owner's Manual from before 1998 - contains disassembly instructions for pre-2001 models, schematics, and parts list (with pre-1998 part numbers)
- Archive.org - Buckmark Owners's Manual #1 from before 1998 - contains disassembly instructions for pre-2001 models, schematics, and parts list (with pre-1998 part numbers)
- Archive.org - Buckmark Owner's Manual #2 from around 2011 - shows partial disassembly of 2001-present models
- ManualsLib.com - Buckmark Owner's Manual #1 - shows partial disassembly of 2001-present models
- ManualsLib.com - Buckmark Owner's Manual #2 - does not show any disassembly
- StevesPages - Buckmark Rifle Owner's Manual - contains disassembly instructions
- Buckmark Owner's Manual - from 2017 on Browning Website - no disassembly instructions
- tiropratico - Buckmark Owner's Manual from before 1998 - contains disassembly instructions for pre-2001 models, schematics, and parts list (with pre-1998 part numbers)
- tiropratico - Buckmark Rifle Owner's Manual - contains disassembly instructions
For a print version of the Buckmark Owner's Manual, order one from Browning via their website
Date of Manufacture (How old is my Buckmark?)
Browning has a page on how to determine when your Buckmark was made. But basically, look at the serial number...
1985-1997: starts with 655 1998-present (at least 2017): starts with 515
Next two letters indicate last two digits of the year: Z=1 Y=2 X=3 W=4 V=5 T=6 R=7 P=8 N=9 M=0
So 655NYxxxxx was made in 1992, or 515ZTxxxxx was made in 2016.
Buckmark Grip Frames (standard/UFX vs. URX vs. UDX)
There are several different grip styles on different Buckmarks, often referred to as standard grips, UFX grips, URX grips, and UDX grips. But note that there are (as of 2016) only 3 different grip frames (the metal part of the gun, under the grip panels). The grip style is often part of the model name, but not always. The problem is, the grip style is an important factor when choosing which Buckmark model to get, and Browning doesn't explain the differences on their website. It is important to make this decision before you buy your Buckmark, because you can change your grip panels, but you can't change your grip frame. If you want more details and pictures, check out this grip frame thread on Rimfire Central. But here's the short version:
- The standard grip and UFX grip have the same frame dimensions. Most aftermarket Buckmark grips fit this grip frame only, because for a long time, it was the only Buckmark grip frame. The standard grip panels are the shaped wooden grips with separate left and right panels, that you usually see on the Hunter and Field models. The UFX grip panels have colored rubber inserts set into the grips. So they have different grip panels attached to them, but they share the same grip frame. As a result, grip panels are interchangeable between standard and UFX models. Because this frame is the largest, people with large hands typically prefer it.
- The URX grip frame has smaller frame dimensions, and is often covered with grips that wrap around the front and have finger grooves (although, when you take the grips off, the front of the metal frame is mostly flat, and does not have finger grooves). Because the URX frame is shorter front-to-back and contoured differently, grip panels made for the standard/UFX grips won't fit on it nicely. Because it has smaller dimensions, people with smaller hands tend to prefer the URX frame to the standard/UFX frame, even though the smallness is mitigated somewhat by the wrap-around nature of most URX grips. The new Buckmark Challenge Rosewood model is an example of the URX grip frame without wrap-around grips, so you can really see the URX grip frame on that model (and, since it does not have wrap-around grips, it will fit very small hands).
- The UDX grip frame is different because it has separate left and right side panels (not a wrap-around grip), but has finger grooves cut into the grip frame itself. As such, only UDX-specific grips will fit nicely on a UDX frame. Dimensionally, the UDX frame is between the larger standard/UFX frame and the smaller URX frame, but since it does not have wrap-around grips, it also tends to fit smaller hands.
Which frame style should you get? If you plan to install aftermarket grips, such as fancy target grips, and your hands aren't too small, you should get one with a standard/UFX frame. Otherwise, go to a store that has a selection of Buckmark pistols, and hold one of each type, and choose the one that fits your hand the best; chances are, it will be obvious when you try them side-by-side. Grip comfort matters.
I already have a Buckmark, or I'm looking to buy a particular Buckmark. Which grip frame does it have? The most reliable way to tell which grip frame a given Buckmark pistol has (without taking the grips off) is to look at the curvature of the backstrap when viewed from the side. The backstrap is the rear-most part of the grip... the part of the metal frame that fits against your palm when holding the gun.
- UFX/standard grip frame backstraps are straight for the top ~90%, then make a sharp curve inward at the bottom.
- URX grip frame backstraps are straight for the top ~70%, then make a gentle curve inward along the bottom ~30%.
- UDX grip frame backstraps are not straight at all, they are gently curved along the entire backstrap.
Look closely at the first 3 pics in the first post of thread 656529 on RimfireCentral.com, and you'll see what I mean. If you're having a hard time seeing it, hold a straight-edge (ruler, piece of paper, whatever) up to the screen to see which parts are straight, and which are curved. Armed with this knowledge, you can just look at a Buckmark pistol from the side, and immediately tell which grip frame it has.
You can also tell by looking at the frontstrap (the metal part of the grip frame under the trigger guard, where your middle, ring, and pinky fingers go when holding the gun) when viewed from the side. Unfortunately, this is not helpful if it has wrap-around grips that cover the frontstrap (unless you're willing to take the grips off, of course). But, if you have a Buckmark on which you can see the front strap, or if you've taken the wrap-around grips off...
- The UFX/standard grip frame frontstrap is completely straight/flat.
- The URX grip frame frontstrap is straight/flat, except that it has a little toe that sticks out at the bottom.
- The UDX grip frame frontstrap is scalloped, with three finger grooves cut into the metal itself.
Again, look at the first 3 pics in the first post of thread 656529 on RimfireCentral.com, and you'll see what I mean. You can also see the toe at the bottom of the frontstrap on all the Buckmark Rifle pics further down in that post, indicating that they are URX grip frames, even though the backstrap curvature is lost because of where the shoulder stock attaches to the bottom of the grip frame.
A few things to note about old vs. new Buckmark wood grips... I was able to compare the (factory original) wood grips on my early 1990's-era Target 5.5 model, to the (factory original) wood grips on a 2015 Hunter model, side-by-side (Thanks, Ken!). They are different. On the old Target model, the left side grip's thumb rest is MUCH more pronounced. On the new Hunter, the right side grip's finger ridge is significantly more pronounced. I like my old left-side grip better, but I think I like the new right-side grip better. Hmmm... a grip purchase may be in my future. Also note that the new Hunter grips are much shinier, and more highly polished, and, to be honest, just prettier-to-look-at pieces of wood. I'm not sure if I'd like the more highly-polished feel when actually shooting, or not, though.
Buckmark Magazines
As far as I know, there are 3 types of magazines for the Buckmark: the old 10-round magazine made by Browning, the new 10-round magazine made by Browning, and a 10-round magazine made by ProMag. The older and newer versions made by Browning differ only in the butt/base/floor plate (bottom of the magazine). The old style base plate is thinner and sits flush with the bottom of the frame/grip. The new style base plate is thicker and sticks out about 1/8" from the bottom of the frame/grip. Both styles work in both newer and older guns (yes, I've actually tried this). The advantage of the newer style is that you have something to grab onto if you want to physically pull the magazine out of the gun. The advantage of the older style is that it sits flush (doesn't stick out the bottom). Either works fine for me.
A company called ProMag makes a 10-round magazine for the Buckmark, but many people report fit or function issues with them. I've never used one myself, though. Visually, the ProMag magazines are very similar to the Browning ones. There are several differences, but the easiest way to tell is by looking where the magazine body meets the base plate. On Browning magazines, this seam is straight. On ProMag magazines this seam is a zig-zag. The best photograph I've found of the ProMag magazine is at Cheaper Than Dirt.
Places to Buy Buckmark Magazines
To see prices for new, in-stock factory magazines: gun.deals search by part number 112055190 and gun.deals search by UPC 023614025290
Another list of prices at AmmoSeek Buckmark Magazines
They are usually available at
Brownells,
MidwayUSA,
Grab-A-Gun,
Glen's Army Navy,
Bud's Guns,
Kentucky Gun Co
The official Browning webpage for the Buckmark Magazine is light on practical information, but does show these:
Browning Part # 112055190
UPC 023614025290
Those can be very useful when doing searches on the internet.
Buckmark Rails
Makers
Weaver vs. Picatinny - Brownells Article on Weaver vs. Picatinny
Mounting an UltraDot on a Hunter (weaver half rail)
Can you dry-fire a Buckmark?
Maybe. Depends on firing pin extension.
If your firing pin extends too far when fired, it may hit and thus peen the breech face (back of) the barrel,
which can lead to extraction issues or feeding issues.
This was not common in older Buckmarks (pre-2001?), but is pretty common in newer Buckmarks.
So common, in fact, that some frustrated owners sarcastically refer to the peen in the barrel as "the Buck mark".
But this is definitely NOT a Buckmark-specific issue.
A search for "22 firing pin protusion" shows it's an issue with lots of different types of guns.
Why would you dry fire a gun? Well, the #1 reason is because it's the best trigger control practice.
If you want to be a better shooter, you NEED to do dry fire practice. This is not up for debate.
But there are other times when you need to (or want to) dry fire.
Some people do it every time they put their gun away, so that springs are not compressed and parts are not under pressure while stored.
Sometimes you need to do it to test the function of your gun.
Sometimes it happens on accident (maybe you didn't put the mag in all the way, or maybe the slide wasn't held back
after the last round, and so you pulled the trigger on an empty chamber). It happens.
You can file down your firing pin, so that it still reliably fires rounds, but cannot reach the barrel.
ADD LINKS FOR HOW TO DO THIS
Many people use some kind of "snap cap" that you put in the chamber before firing, to protect the barrel and firing pin
from being damaged by dry firing.
Here are some 22LR snap cap options, in approximate order from best to worst:
- Larry's Guns sells
dry fire plugs
(they call them chamber plugs).
These are a good balance between hard enough to be protective, tough enough to last for many strikes,
and soft enough to prevent damage to the firing pin.
They are cut off on the side, so that the extractor does not remove them when you rack the slide.
Because they last, the $10 for a 10-pack is a reasonable deal. So far, these are the best I've found.
- Yellow drywall anchors - They work, and are cheap.
They don't last very long (rotating them to hit a different spot helps, but that's not ideal), but they are cheap.
If you want them to stay in when you rack the slide, cut off the edge that your extractor would grab.
You want the size 4-6-8 x 7/8" ones.
You can get them for about $6 for a 100-pack at Amazon.
- Flat fridge magnet - Take a regular flat fridge magnet, and cut it up so that you can put it on the back of the barrel.
These magnets are soft, so they absorb the firing pin hit and protect the barrel.
They have a little bit of spring-back so they can be used a few times before you move it.
They don't get extracted when you rack the slide.
- Used 22 brass - They work, and are free if you pick up your brass at the range.
They probably don't do a great job after a few hits in the same spot, so you should probably rotate them.
They get extracted when you rack the slide, and they can be difficult to get in
so you end up doing more fiddling with them than actual dry-fire practicing.
- Empty chamber - As long as your firing pin doesn't hit the barrel, this is mostly ok.
You do risk mashing whatever it is that is stopping the firing pin, though.
On some guns (like the Buckmark) this is a pin that goes through a hole in the firing pin itself.
With nothing else to stop it, the firing pin whacks that cross pin on each dry fire.
It'll probably take that bashing for a good long while before problems develop, but it IS getting bashed.
On some guns, the firing pin has a ledge that hits the slide.
Again, it'll take that abuse for quite a while, but it IS getting bashed.
- Pachmayr 22LR Plastic Safety Snap Caps - I've never used them myself,
but the reviews on Amazon on not flattering.
Lots of complaints about them breaking during use, and getting stuck in the chamber.
Looks like they would extract when you rack the slide.
- A-Zoom action-proving 22LR dummy rounds - As the name implies, these are made for testing the action of your gun...
things like feeding from the magazine, extracting, practicing mag changes, etc.
But they make lousy snap-caps, because they are aluminum.
They protect the barrel, but don't really protect the firing pin. They get extracted when you rack the slide.
And they aren't super cheap, either.
12-pack for $12 on Amazon.
But they're good for action-proving (would be better if they were a more realistic weight and balance).
- Tipton 22LR snap caps - These are the worst. They are made of cheap hard plastic.
They function once, but I wouldn't re-use the same spot again, because they have no resilience.
The plastic they are made of is so hard, that sometimes they shatter when used. This is a horrible thing.
Who wants to search for and then pick tiny plastic shards out of their gun? (Or step on them when they fall on the floor.)
They extract when you rack the slide.
Yellow drywall anchors are a better choice in almost every way, and these cost 10 times as much.
$7 for a 10-pack on Amazon.
What type of ammo to use
Pre-2000 Buckmark Firing Pins
In the year 2000, Browning made internal changes to the Buckmark, including changes to the firing pin and it's assembly. The result is that there are (as of 2017) two types of firing pins for Buckmarks... new/current ones (part # B5150002 FIRING PIN ('00-PRESENT)), which are available from Browning and gun parts places, and pre-2000 firing pins (part # B5152657 FIRING PIN (PRE '00)), which are unavailable/sold out from Browning, Midway, Brownells, Numrich, etc. Intermittently, there are individuals who make small batches of them.
- Rusty22 (member of the RimfireCentral.com Buckmark forum) made some in the past, but they were not on his price list in October of 2015.
- Bill Striplin (member of the RimfireCentral.com Buckmark forum), also known as SCG (Striplin Custom Gunworks). He makes and sells pre-2000 Buckmark firing pins on his website. They became available on Jan 4, 2016. I ordered some.
- Jack First (http://www.jackfirstgun.com/) sells a pre-2000 Buckmark firing pin for $20. They don't list them on their website, you have to call them. I ordered one in Dec 2017.
- I've read that Ahlman's may have them, too.
Buckmark Trigger Improvements
Buckmarks come new from the factory with perfectly reasonable, perfectly usable triggers. Most people report stock trigger pull weights in the 4 to 5.5 pound range, which is pretty typical for a factory pistol. For many uses, like plinking, introducing new shooters to the sport, and even hunting, it makes sense to leave it as-is. However, many Buckmarks are used for competitions (such as Bullseye and Steel Challenge), or as target guns, or, well, some people just like tinkering with their guns. So, a lot of people want their Buckmark to have a smoother pull with a lighter pull weight. Obviously, taking it to a gunsmith for a trigger job is one option, but if you want to work on it yourself...
The simplest thing you can do, especially with a factory-new Buckmark, is take it apart, see how it works, and VERY lightly smooth out any rough spots where any two pieces of metal rub when pulling the trigger. When I say VERY lightly, I'm talking about 5 or fewer light (very little pressure) passes across a piece of 1600 or 2000 grit sandpaper placed on a piece of plate glass (like from a picture frame). You can find 1600 or 2000 grit sandpaper at the auto parts store, it's used to smooth out painted surfaces. Common things to sand are top of the disconnector (if you are keeping the magazine disconnect safety wire in the gun), the back of the disconnector (where it touches the frame), and the hammer (where the sear touches it).
Another common thing to do is to remove the magazine disconnect safety wire. This wire did not exist on older Buckmarks (possibly introduced around the year 2000). This wire can be seen by removing the right side grip panel. It is the long wire running from the bottom of the grip to the top, where it bends around the top of the disconnector. The purpose of this wire is to not allow the gun to fire unless there is a magazine inserted into the magazine well. Presumably, this prevents people from shooting themselves accidentally while cleaning their guns, because they forgot that they left a round in the chamber (you should ALWAYS ensure the gun is empty before cleaning). Unfortunately, this mechanism also affects the trigger pull, because that magazine disconnect safety wire drags on the disconnector. So, removing the wire will improve the trigger pull. If you're not comfortable with removing it (and that's fine; do not feel pressured to do this!), you can minimize the negative effect on the trigger pull with some judicious smoothing of the disconnector (and maybe even the wire itself).
Another common thing to do is to reduce any unneeded movement of the various parts that affect the trigger pull. Some people either replace the stock trigger with a Browning replacement part that has an over-travel screw in it, or they add an over-travel screw to their stock trigger, or they install an aftermarket trigger that has an over-travel screw in it. Some people report that their sear fits rather loosely on their sear pin, allowing the sear to twist a bit when first pushed by the disconnector. So they order a second sear and a few extra sear pins from Browning, and try to find a sear/pin combination that's tighter. Some people try to make the fit between the disconnector and the sear tighter by making the gap between disconnector and the sear a bit smaller (reduces pre-travel or creep). You do this by heating the disconnector and then mashing it between a hammer and an anvil (not for the faint of heart).
Another common thing to do is to reduce the trigger pull weight by doing various things to the sear spring. The most common sear spring modification is the "Heggis Flip" (named after the guy who invented it, named Heggis). Here are the instructions on RimfireCentral thread 1468180 post 52. What you do is take out the sear spring and then re-install it upside down, so that the legs are below the coils, instead of on top of them. The rear leg is still at the rear, and the front leg is still at the front. This reduces the pull weight, often by a pound or so, and has the advantages of being free to try, and easily reversible. The problem with the Heggis Flip is that many people either don't get the legs in the correct position or are reluctant to bend the legs so that they do fit right. The result is that the trigger won't reset reliably (meaning that you pull the trigger, the round fires, the slide cycles, and a new round is fed into the chamber, but when you pull the trigger again, nothing happens, because the sear & hammer didn't reset to their firing positions). This seems to be a more common issue with newer models, possibly because Browning changed how the legs are bent on the sear spring.
Here's a link to a forum thread that contains pics of how the sear spring should look when doing the Heggis flip, from the man himself (Heggis)
A common alternative to the Heggis Flip used to be to replace your stock sear spring with the "Silhouette" sear spring, made by Browning for the Buckmark Silhouette model. That model used a lighter-weight sear spring that had it's legs bent in a slightly different way than the stock sear spring on other Buckmark models. But it turns out that you can install a Silhouette sear spring into any model of Buckmark, and get the advantages of the lighter trigger pull weight (because it's a lighter-weight spring), with much less likelihood of having trigger reset issues than with the Heggis Flip. Unfortunately, Browning seems to have stopped making Silhouette sear springs and as of 2017, they are no longer available from any vendors or retailers.
When you buy the Volquartsen aftermarket hammer for the Buckmark, you also get a replacement sear spring with it. Many people claim that this spring is a Silhouette sear spring. That may have been true at one point, but when I ordered one in Feb 2017, the spring that came with it was NOT a Silhouette sear spring. It appeared to be lighter weight than the stock spring, but had no bends in the legs. I haven't tried to use it yet.
What would really be nice, is if someone made a selection of aftermarket sear springs of different weights that already had the legs bent correctly. That would allow people to use the spring they want to get the weight they desire, with less chance of having reset problems or other fit-related problems. I'm toying with the idea of being that someone.
Personal Experience
- Guns.com - 2013 article about Buckmark History
- The Buck Mark Story - Guns Magazine, August, 1999 by Clair Rees
- American Rifleman - Gun of the Week for April 7, 2018 is the Buckmark Camper
- American Rifleman - 2018 review of the Buckmark Field-Target Suppressor-Ready model
- American Rifleman - 2017 Buckmark Models
- The Truth About Guns (TTAG) - Review of a Buckmark Camper
- Gun Digest - Buckmark Review from 2011
- Internet Movie Firearms Database page on the Buckmark
- Wikipedia page about the Buckmark (not very informative)
- Gunivore - Buckmark Review from 2017
- 19fortyfive - Buckmark Review from 2021
- StevesPages - Buckmark Owner's Manual from before 1998 - contains disassembly instructions for pre-2001 models, schematics, and parts list (with pre-1998 part numbers)
- textfiles.com - Buckmark Owner's Manual from before 1998 - contains disassembly instructions for pre-2001 models, schematics, and parts list (with pre-1998 part numbers)
- Archive.org - Buckmark Owners's Manual #1 from before 1998 - contains disassembly instructions for pre-2001 models, schematics, and parts list (with pre-1998 part numbers)
- Archive.org - Buckmark Owner's Manual #2 from around 2011 - shows partial disassembly of 2001-present models
- ManualsLib.com - Buckmark Owner's Manual #1 - shows partial disassembly of 2001-present models
- ManualsLib.com - Buckmark Owner's Manual #2 - does not show any disassembly
- StevesPages - Buckmark Rifle Owner's Manual - contains disassembly instructions
- Buckmark Owner's Manual - from 2017 on Browning Website - no disassembly instructions
- tiropratico - Buckmark Owner's Manual from before 1998 - contains disassembly instructions for pre-2001 models, schematics, and parts list (with pre-1998 part numbers)
- tiropratico - Buckmark Rifle Owner's Manual - contains disassembly instructions
- The standard grip and UFX grip have the same frame dimensions. Most aftermarket Buckmark grips fit this grip frame only, because for a long time, it was the only Buckmark grip frame. The standard grip panels are the shaped wooden grips with separate left and right panels, that you usually see on the Hunter and Field models. The UFX grip panels have colored rubber inserts set into the grips. So they have different grip panels attached to them, but they share the same grip frame. As a result, grip panels are interchangeable between standard and UFX models. Because this frame is the largest, people with large hands typically prefer it.
- The URX grip frame has smaller frame dimensions, and is often covered with grips that wrap around the front and have finger grooves (although, when you take the grips off, the front of the metal frame is mostly flat, and does not have finger grooves). Because the URX frame is shorter front-to-back and contoured differently, grip panels made for the standard/UFX grips won't fit on it nicely. Because it has smaller dimensions, people with smaller hands tend to prefer the URX frame to the standard/UFX frame, even though the smallness is mitigated somewhat by the wrap-around nature of most URX grips. The new Buckmark Challenge Rosewood model is an example of the URX grip frame without wrap-around grips, so you can really see the URX grip frame on that model (and, since it does not have wrap-around grips, it will fit very small hands).
- The UDX grip frame is different because it has separate left and right side panels (not a wrap-around grip), but has finger grooves cut into the grip frame itself. As such, only UDX-specific grips will fit nicely on a UDX frame. Dimensionally, the UDX frame is between the larger standard/UFX frame and the smaller URX frame, but since it does not have wrap-around grips, it also tends to fit smaller hands.
- UFX/standard grip frame backstraps are straight for the top ~90%, then make a sharp curve inward at the bottom.
- URX grip frame backstraps are straight for the top ~70%, then make a gentle curve inward along the bottom ~30%.
- UDX grip frame backstraps are not straight at all, they are gently curved along the entire backstrap.
- The UFX/standard grip frame frontstrap is completely straight/flat.
- The URX grip frame frontstrap is straight/flat, except that it has a little toe that sticks out at the bottom.
- The UDX grip frame frontstrap is scalloped, with three finger grooves cut into the metal itself.
But this is definitely NOT a Buckmark-specific issue. A search for "22 firing pin protusion" shows it's an issue with lots of different types of guns.
Why would you dry fire a gun? Well, the #1 reason is because it's the best trigger control practice. If you want to be a better shooter, you NEED to do dry fire practice. This is not up for debate.
But there are other times when you need to (or want to) dry fire. Some people do it every time they put their gun away, so that springs are not compressed and parts are not under pressure while stored. Sometimes you need to do it to test the function of your gun. Sometimes it happens on accident (maybe you didn't put the mag in all the way, or maybe the slide wasn't held back after the last round, and so you pulled the trigger on an empty chamber). It happens.
You can file down your firing pin, so that it still reliably fires rounds, but cannot reach the barrel. ADD LINKS FOR HOW TO DO THIS
Many people use some kind of "snap cap" that you put in the chamber before firing, to protect the barrel and firing pin from being damaged by dry firing.
Here are some 22LR snap cap options, in approximate order from best to worst:
- Larry's Guns sells dry fire plugs (they call them chamber plugs). These are a good balance between hard enough to be protective, tough enough to last for many strikes, and soft enough to prevent damage to the firing pin. They are cut off on the side, so that the extractor does not remove them when you rack the slide. Because they last, the $10 for a 10-pack is a reasonable deal. So far, these are the best I've found.
- Yellow drywall anchors - They work, and are cheap. They don't last very long (rotating them to hit a different spot helps, but that's not ideal), but they are cheap. If you want them to stay in when you rack the slide, cut off the edge that your extractor would grab. You want the size 4-6-8 x 7/8" ones. You can get them for about $6 for a 100-pack at Amazon.
- Flat fridge magnet - Take a regular flat fridge magnet, and cut it up so that you can put it on the back of the barrel. These magnets are soft, so they absorb the firing pin hit and protect the barrel. They have a little bit of spring-back so they can be used a few times before you move it. They don't get extracted when you rack the slide.
- Used 22 brass - They work, and are free if you pick up your brass at the range. They probably don't do a great job after a few hits in the same spot, so you should probably rotate them. They get extracted when you rack the slide, and they can be difficult to get in so you end up doing more fiddling with them than actual dry-fire practicing.
- Empty chamber - As long as your firing pin doesn't hit the barrel, this is mostly ok.
You do risk mashing whatever it is that is stopping the firing pin, though.
On some guns (like the Buckmark) this is a pin that goes through a hole in the firing pin itself. With nothing else to stop it, the firing pin whacks that cross pin on each dry fire. It'll probably take that bashing for a good long while before problems develop, but it IS getting bashed.
On some guns, the firing pin has a ledge that hits the slide. Again, it'll take that abuse for quite a while, but it IS getting bashed. - Pachmayr 22LR Plastic Safety Snap Caps - I've never used them myself, but the reviews on Amazon on not flattering. Lots of complaints about them breaking during use, and getting stuck in the chamber. Looks like they would extract when you rack the slide.
- A-Zoom action-proving 22LR dummy rounds - As the name implies, these are made for testing the action of your gun... things like feeding from the magazine, extracting, practicing mag changes, etc. But they make lousy snap-caps, because they are aluminum. They protect the barrel, but don't really protect the firing pin. They get extracted when you rack the slide. And they aren't super cheap, either. 12-pack for $12 on Amazon. But they're good for action-proving (would be better if they were a more realistic weight and balance).
- Tipton 22LR snap caps - These are the worst. They are made of cheap hard plastic. They function once, but I wouldn't re-use the same spot again, because they have no resilience. The plastic they are made of is so hard, that sometimes they shatter when used. This is a horrible thing. Who wants to search for and then pick tiny plastic shards out of their gun? (Or step on them when they fall on the floor.) They extract when you rack the slide. Yellow drywall anchors are a better choice in almost every way, and these cost 10 times as much. $7 for a 10-pack on Amazon.
- Rusty22 (member of the RimfireCentral.com Buckmark forum) made some in the past, but they were not on his price list in October of 2015.
- Bill Striplin (member of the RimfireCentral.com Buckmark forum), also known as SCG (Striplin Custom Gunworks). He makes and sells pre-2000 Buckmark firing pins on his website. They became available on Jan 4, 2016. I ordered some.
- Jack First (http://www.jackfirstgun.com/) sells a pre-2000 Buckmark firing pin for $20. They don't list them on their website, you have to call them. I ordered one in Dec 2017.
- I've read that Ahlman's may have them, too.
I own a "Target 5.5" model made in 1990, and I've owned it since it was new. The thing is simply awesome. I love the stock grips; they fit my hand very nicely. The only modification that I've made to it, is to add an Ultradot Matchdot II red dot sight; that's it. It shoots master-level scores (95+) in NRA Precision Pistol (aka Bullseye) competition. The only failure I've had with it in competition, was due to wax build-up in the magazine from the excess wax on the tips of CCI Standard Velocity ammo. The only part on it that has ever broken is the plastic buffer. I did have to JB Weld the slide stop thumb piece back on once, too. The only ammo that it didn't feed/fire/eject reliably has been Federal 510, and it doesn't eject Federal 711B reliably when dirty, otherwise it eats anything, high velocity or standard velocity. It loves Eley Target and Eley Club ammo, so that's what I shoot for Bullseye practice and competitions. I clean the chamber/breech area and lube the slide-to-frame spots every few hundred rounds, and it just shoots and shoots. I like my other guns a lot, but this one is my favorite.
I also own a few other Buckmarks. I have a 2016 Buckmark Hunter that is for my son, a 2015 Buckmark Plus UDX for my wife, and a 1992 Gold Target 5.5 that I bought used in 2017.